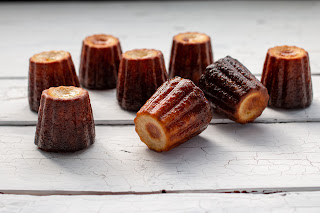
Gluten free Cannelé,

I was first introduced to Cannelés by my bobbin lace teacher, Robyn Keatley. Robyn had experimented with gluten-free flour and made them for supper to enjoy during our lace class. They were pretty good! Robyn used silicon moulds and was searching for some of the more traditional trays in which to bake them. From then on, whenever I was in a cookware shop, I kept an eye out for the trays. The right tools not only make cooking easier but also enhance the dish. There is a reason why these large, fluted thimble shapes have been used to make this dish.
 In 2018 I was fortunate to spend time in the Basque region of France. Our home base for the week was St Jean Pied de Port. This town, in the foothills of the Pyrennes was the capitol of Lower Navarre. It was built after Richard the Lionheart razed the nearby town of St Jean le Vieux in 1177. This amazing walled town still has the cobblestone streets and a citadel. It continues to be a major tourist destination for those walking the pilgrimage route of the Camino de Santiago. One of the fabulous artisan shops in the town is home to the cannelé artisan baker. He had nine different flavours, including savoury ones. Myles of course, tried them all! In my "best french" I spoke with the baker - he was adamant that you needed the best tins you could purchase. He also advised to use a special spray to prevent them sticking which I unfortunately cannot buy in Australia.
I have purchased two copper tins, which are very expensive. Despite several attempts, I have yet to successfully season these tins so that the Cannelés do not stick. The solid metal tray that I purchased in Australia has worked perfectly every time. A simple trick to ensure that the batter doesn't stick in the fluted tins is to chill the tray before coating with melted butter. You can use muffin tins, but the cooking time will vary due to the increased volume of the tins. You are aiming for a deep toffee colour on the top when baking.
Many of the recipes available online advise preparing the batter at least 24 hours prior to baking. This is equally important in the gluten-free version. The batter does separate, but it allows the flour to absorb the moisture and the flavours to develop. I wouldn't recommend leaving the batter for longer than three days, though - the texture of the Cannelés does change and becomes denser the longer you leave the batter in the fridge. This is particularly true if using wheat-based (non-GF flours) as the traditional flour used is bread flour.
A word of warning - usually with gluten-free baking, you need to leave the goods in the tin to cool. However, as the sugar in the Cannelés forms a caramel crisp outside, leaving them in the tin only results in them sticking and tears. Turn these out straight away onto a wire rack when you take them out of the oven.
Myles' favourite was the traditional rum and vanilla, which I have converted to gluten-free. The outside is crisp, the inside light, fluffy, and a bit custardy (if you eat them hot). For all the details and tips, watch my YouTube video in the link provided below.
600 ml whole milk
1 vanilla bean
30 g soft butter
180 g caster sugar
100 g gluten free plain flour
3 eggs
Fat pinch of sea salt
80 ml dark rum
Day 1.
Place milk in a saucepan.
Split vanilla pod and scrape out the seeds. Add seeds and pod to the milk and heat gently. Once it is just simmering, add the butter and remove pan from the heat.
In a large jug combine sugar, flour, eggs and salt. Using a spatula, so as not to incorporate too much air, add the milk. Then add the rum, mixing well.
Using a fine mesh sieve, sieve the batter back into the pot. Sieve the batter again back into the jug. Return the vanilla pod to the jug. Allow the batter to come to room temperature, and then refrigerate for at least 24 hours. Batter can be stored for 48 hours if required.
Baking day:
Preheat oven to 230°C fan/250°C.
Chill Cannelé pan and then brush with melted butter.
Remove the vanilla pod from the batter. The batter will have separated, so gently remix, again without incorporating too much air.
Fill cannelé tins to about 1 cm from the top, to allow for the batter to rise during baking.
Bake for 15 minutes, then turn the oven down to 180°C fan/200°C and bake for another 30 minutes.
Turn immediately onto a cooling tray.
updated July 2023


Comments
cheapness is the reason being that of this country and other areas people most prefer to sell their items